What will my new pump look like when its done?
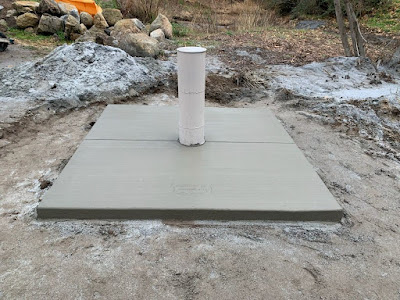
Often we are asked what will my new pump installation look like? Most of what gets installed in your newly drilled well is below the surface and you aren't able to see it but topside there are few things you should see. Here's a recent example of one of our new pump installations in a newly drilled well:


In California, well drilling is covered under Bulletin 74-81 that provides standards for well installation, design and maintenance. More information about Bulletin 74-81 and its updates can be found here. While Bulletin 74-81 has not been adopted on a state-wide level many of the ordinances that exist in our local county laws derive from its researched based approach.
One such requirement in every county in California is that a check valve be installed at the well head, above the surface. Check valves are installed to control water flow and only allow water to flow one direction. Here's a quick video on the purpose and installation of check valves. Often times, during well inspections we notice that a check valve is not installed on existing well systems. This is a requirement and has been since the inception of Bulletin 74-81 which dates back to 1968 when they were formally adopted, here's a history lesson for those that might be interested. Nevertheless, a check valve should be installed at surface level of every installation. We cover more about well inspections in another blog article here.
Another common item that is installed top-side of your well pump is the pressure tank. Here at Heritage Well we believe in installing a pressure tank on almost every system to protect your well pump from improper use. Often we come across installations in which a customer is improperly using their well pump, thus reducing its life expectancy. These include things like in-line filters before a pressure tank or other pressure requiring connections in absence of a pressure tank. A properly sized well pump should be able to pressurize at the surface.
Another common item that is installed top-side of your well pump is the pressure tank. Here at Heritage Well we believe in installing a pressure tank on almost every system to protect your well pump from improper use. Often we come across installations in which a customer is improperly using their well pump, thus reducing its life expectancy. These include things like in-line filters before a pressure tank or other pressure requiring connections in absence of a pressure tank. A properly sized well pump should be able to pressurize at the surface.
Other common items that you will see in our installations are a hose bib and sample spigot. A hose bib and sample spigot are also common county requirements in a residential well system. In Riverside County for example a sample spigot is required on all new well installations and must include a non-threaded connection in which to take a sample from for potability. A sample spigot is usually brass or stainless steel and allow for a connection in which bacteria cannot collect for sampling purposes.
Are you interested in learning more about a pumping system in your new well? Give our team a call to discuss your needs and requirements and let's see if we can put a proposal together for you! 951-763-2210.

Comments
Post a Comment